Using Git for Mod Version Management
Posted: Sat Mar 03, 2018 9:43 pm
What this post is about:
When I post Stars in Shadow patches, I tend to break existing mods. This is unfortunate, but it’s also a fairly inevitable side-effect of development. However, most of the time, updating a mod to work with the latest version of the game should, in theory, be pretty easy. More exactly, updating a mod should be pretty easy if you’re a savvy user of a version control system like git.
Unfortunately, version control systems are a bit complex to setup and learn to use. But if you take the time to figure them out, they are hugely useful tools. This is a short guide for the benefit of modders who would like to update their mods to new versions with a minimum of hassle -- it contains a walkthrough of how to use git to automate the process of updating a mod to be compatible with the latest version of the game. However, it’s not a complete guide for git -- and if you’re a novice git user, you’ll almost certainly need to supplement the information here with other bits and pieces gleaned from around the web. If you’re interested, and have the time, you may even want to read the official Pro Git book.
At heart, version control systems let you track the history of files as they’re being changed by various developers. In the case of Stars in Shadow mods, this means they can track both the changes that I’m making in the official patches, and the changes that you’re making as a modder. As long as none of the changes I’ve made overlap with changes you’ve made, your mod can be updated automatically by the versioning system whenever I post a new update, using something called a ‘merge’ operation. If your changes do happen to overlap with changes I've made, that situation can be detected and worked out as well, using a process called 'conflict resolution'.
The Core Steps:
Grab a copy of your favorite git user interface. I suggest Sourcetree (creating a free account may be necessary to complete the install).
Next, replace the Lua state directory from a working Stars in Shadow install with a source-controlled version of the directory. The safest way to do this is to copy a working Stars in Shadow install -- say by simply copying the whole Stars in Shadow directory from a Steam or GoG install to somewhere else. Then delete the copied directory’s 'Lua state' dir.
In sourcetree, go to Repository->Clone and enter the following URL: http://stars-in-shadow.com/git/sislua.git. Then, in Destination, enter the full path of the Lua state directory you just deleted. That should get you a version-controlled directory that contains data for the ‘Lua state’ dir.

(Creating an empty 'Lua state' directory may make it easier to set the proper Destination.)
Once your Lua state download is complete, check that you can still run your copied Stars in Shadow MOD install using sis64.exe.
Step 2: Checkout the version of the Stars in Shadow code your mod is based on.
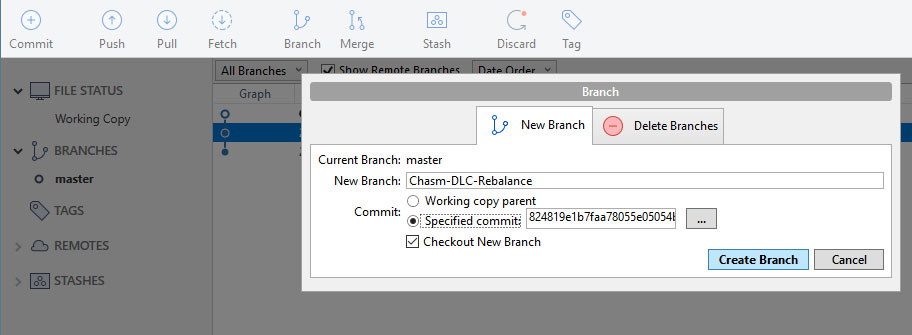
In Sourcetree, click on Branches->master. You should now see a simple graph, showing a collection of official release versions of the game (plus any mods I've added as examples). Hopefully, one of the official versions is compatible with your mod. Right-click on it, and select ‘Branch’. Enter a sensible name for your mod as the branch name. When you complete the operation, your Lua state directory contents will have switched to contain whatever they used to be in that older version.

Check that the game still works.
Step 3: Creating your new ‘branch’.
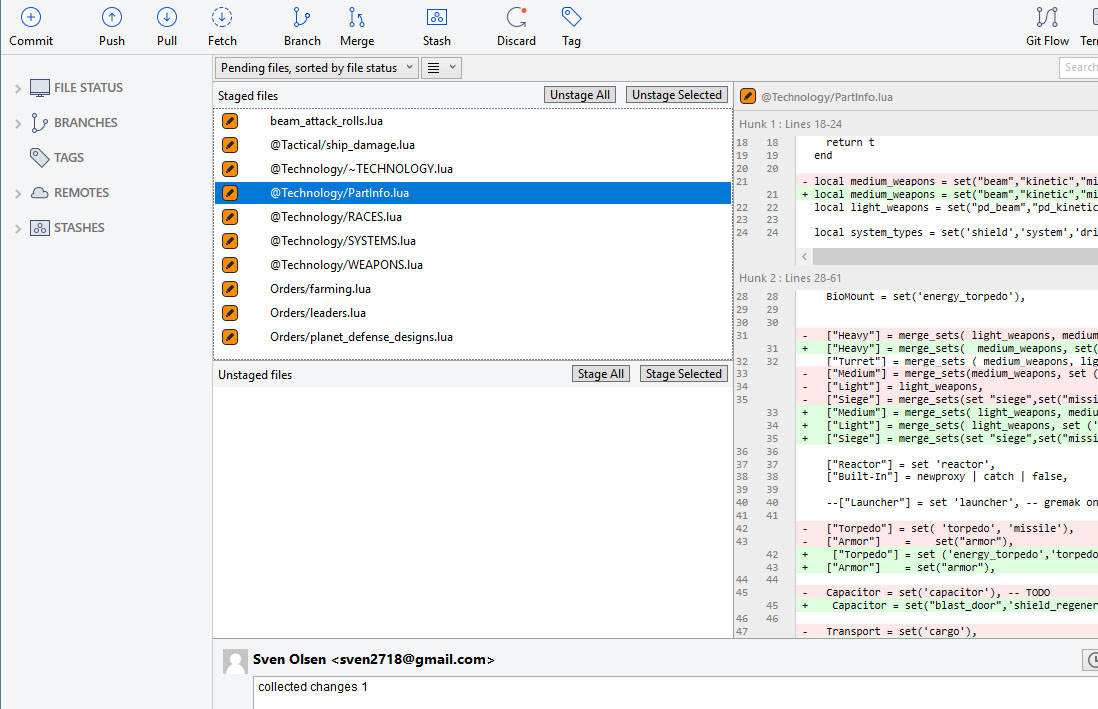
Now, for each file you’ve modded, copy it over the corresponding file in your version controlled Lua state (don’t use the Mods folder). Switching to the File Status->Working Copy tab, and you should see a browse-able version of all the changes you’ve made appearing as you copy in your files. (If your changes appear to be complete rewrites of a file, you probably have an git configuration problem -- write a comment asking for help changing your autocrlf setting.)

When you’ve added all your files, verify that your mod is working, then hit 'Stage all' and ‘Commit.’ You'd need to enter a note describing your changes to complete the commit i.e. ‘Mod v1’.
Step 4: ‘Merge’ your branch with the latest official version
Go back to ‘Branches’. Right click on the current master branch, and select ‘merge’. Ideally, that will create a new version of Lua state, one that merges your changes with mine. Go to Working Copy to review the merged changes, and verify that the mod works by testing with sis64.exe.

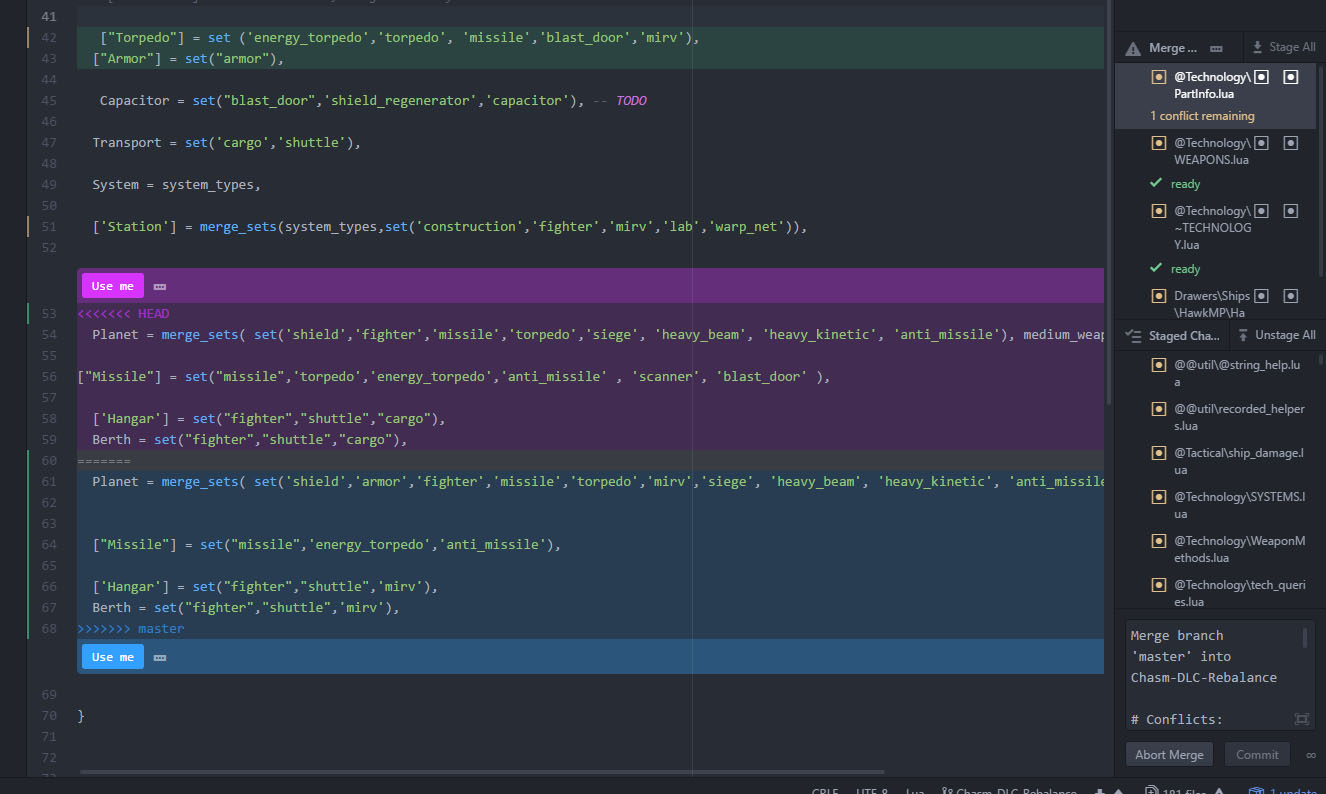
If there are any 'conflicts' detected during the merge, you'll need to 'resolve' them. Conflicts are places where both you and I have made changes to the same piece of the source code. Resolving conflicts can be complex and painful, but, again, there are tools out there that make it relatively straightforward, provided you take the time to learn to use them. At the moment, my favorite conflict resolution tools for git are the ones included in Atom.

When you're done looking over the merge, check that your Mod is still working as intended, then save your work by 'committing' the merge changes.
Step 5: Export your updated mod.
Re-export your mod, by copying each of the files you’ve edited into a new directory, and zipping that up as something that other players can download. For a large, complex mod (i.e., something like Chasm's), this process will be a bit tedious. I'm tempted to write a quick perl script that does the export for you automatically (git and perl play very nicely together), but, I'll hold off on that unless/until someone asks for it.
Step 6: Continue modding and merging as needed.
Continue working on your mod inside your version controlled Lua state dir. When a new official update comes out, copy sis64.exe from the official Stars in Shadow directory to your modded copy. Then hit the 'fetch' button in Sourcetree. This should get you an updated 'master' branch that you can once again merge into your mod. (If an updated 'master' hasn't been posted yet, send me a note reminding me to put it up.) Go back to Step 5, rinse and repeat
Legal Notes:
The git repository at http://stars-in-shadow.com/git/sislua.git is provided only as a convenience for modders. Legal rights to all code, images, music files, etc contained within the git repository are Copyright Ashdar Games, and should not be shared for any purpose other than modding.
When I post Stars in Shadow patches, I tend to break existing mods. This is unfortunate, but it’s also a fairly inevitable side-effect of development. However, most of the time, updating a mod to work with the latest version of the game should, in theory, be pretty easy. More exactly, updating a mod should be pretty easy if you’re a savvy user of a version control system like git.
Unfortunately, version control systems are a bit complex to setup and learn to use. But if you take the time to figure them out, they are hugely useful tools. This is a short guide for the benefit of modders who would like to update their mods to new versions with a minimum of hassle -- it contains a walkthrough of how to use git to automate the process of updating a mod to be compatible with the latest version of the game. However, it’s not a complete guide for git -- and if you’re a novice git user, you’ll almost certainly need to supplement the information here with other bits and pieces gleaned from around the web. If you’re interested, and have the time, you may even want to read the official Pro Git book.
At heart, version control systems let you track the history of files as they’re being changed by various developers. In the case of Stars in Shadow mods, this means they can track both the changes that I’m making in the official patches, and the changes that you’re making as a modder. As long as none of the changes I’ve made overlap with changes you’ve made, your mod can be updated automatically by the versioning system whenever I post a new update, using something called a ‘merge’ operation. If your changes do happen to overlap with changes I've made, that situation can be detected and worked out as well, using a process called 'conflict resolution'.
The Core Steps:
- Get a copy of the Stars in Shadow version control data.
- Checkout the version of the Stars in Shadow code your mod is based on.
- Create a new ‘branch’ that contains your modded files.
- ‘Merge’ your branch with the latest official version.
- Export your updated mod as a downloadable that people on Steam etc. can easily install.
Grab a copy of your favorite git user interface. I suggest Sourcetree (creating a free account may be necessary to complete the install).
Next, replace the Lua state directory from a working Stars in Shadow install with a source-controlled version of the directory. The safest way to do this is to copy a working Stars in Shadow install -- say by simply copying the whole Stars in Shadow directory from a Steam or GoG install to somewhere else. Then delete the copied directory’s 'Lua state' dir.
In sourcetree, go to Repository->Clone and enter the following URL: http://stars-in-shadow.com/git/sislua.git. Then, in Destination, enter the full path of the Lua state directory you just deleted. That should get you a version-controlled directory that contains data for the ‘Lua state’ dir.

(Creating an empty 'Lua state' directory may make it easier to set the proper Destination.)
Once your Lua state download is complete, check that you can still run your copied Stars in Shadow MOD install using sis64.exe.
Step 2: Checkout the version of the Stars in Shadow code your mod is based on.
In Sourcetree, click on Branches->master. You should now see a simple graph, showing a collection of official release versions of the game (plus any mods I've added as examples). Hopefully, one of the official versions is compatible with your mod. Right-click on it, and select ‘Branch’. Enter a sensible name for your mod as the branch name. When you complete the operation, your Lua state directory contents will have switched to contain whatever they used to be in that older version.

Check that the game still works.
Step 3: Creating your new ‘branch’.
Now, for each file you’ve modded, copy it over the corresponding file in your version controlled Lua state (don’t use the Mods folder). Switching to the File Status->Working Copy tab, and you should see a browse-able version of all the changes you’ve made appearing as you copy in your files. (If your changes appear to be complete rewrites of a file, you probably have an git configuration problem -- write a comment asking for help changing your autocrlf setting.)

When you’ve added all your files, verify that your mod is working, then hit 'Stage all' and ‘Commit.’ You'd need to enter a note describing your changes to complete the commit i.e. ‘Mod v1’.
Step 4: ‘Merge’ your branch with the latest official version
Go back to ‘Branches’. Right click on the current master branch, and select ‘merge’. Ideally, that will create a new version of Lua state, one that merges your changes with mine. Go to Working Copy to review the merged changes, and verify that the mod works by testing with sis64.exe.

If there are any 'conflicts' detected during the merge, you'll need to 'resolve' them. Conflicts are places where both you and I have made changes to the same piece of the source code. Resolving conflicts can be complex and painful, but, again, there are tools out there that make it relatively straightforward, provided you take the time to learn to use them. At the moment, my favorite conflict resolution tools for git are the ones included in Atom.

When you're done looking over the merge, check that your Mod is still working as intended, then save your work by 'committing' the merge changes.
Step 5: Export your updated mod.
Re-export your mod, by copying each of the files you’ve edited into a new directory, and zipping that up as something that other players can download. For a large, complex mod (i.e., something like Chasm's), this process will be a bit tedious. I'm tempted to write a quick perl script that does the export for you automatically (git and perl play very nicely together), but, I'll hold off on that unless/until someone asks for it.
Step 6: Continue modding and merging as needed.
Continue working on your mod inside your version controlled Lua state dir. When a new official update comes out, copy sis64.exe from the official Stars in Shadow directory to your modded copy. Then hit the 'fetch' button in Sourcetree. This should get you an updated 'master' branch that you can once again merge into your mod. (If an updated 'master' hasn't been posted yet, send me a note reminding me to put it up.) Go back to Step 5, rinse and repeat
Legal Notes:
The git repository at http://stars-in-shadow.com/git/sislua.git is provided only as a convenience for modders. Legal rights to all code, images, music files, etc contained within the git repository are Copyright Ashdar Games, and should not be shared for any purpose other than modding.